Sprinkler Repair | Sprinkler Head Adjustment
Adjustable heads are preset to approximately 180°. Sprinklers may be adjusted with water on or off. It is recommended that initial adjustments be made before installation.
Using the palm of your hand, rotate the nozzle turret counterclockwise to the left stop to complete any interrupted rotation cycle.
Rotate the nozzle turret clockwise to the right stop. This is the fixed side of the arc. The nozzle turret must be held in this position for arc adjustments. The right stop does not change.
Hunter PGP® – How to Increase the Arc
Insert the plastic key end of the Hunter wrench into the adjustment socket.
While holding the nozzle turret at the right stop, turn the wrench clockwise. Each full 360° turn of the wrench will increase the arc 90°.
Adjust to any arc between 40° and 360°.
Hunter PGP® – Adjusting Radius and Distance of Throw
Insert the steel hex end of the Hunter wrench into the radius adjustment screw.
Turn the screw clockwise (into the stream of water) to decrease the radius, or counterclockwise to increase the radius. Radius can be reduced up to 25%.
Caution: Turning the adjustment screw clockwise more than five full turns may result in a lost radius adjustment screw.
Hunter PGP® – Precipitation Rate Adjustment
If you have excessively wet or dry areas, you can change the nozzle in the sprinkler to increase or decrease the precipitation rate. For dry areas, install a larger nozzle. For wet areas, install a smaller nozzle.
Hunter PGP® – Nozzle Installation
Insert the plastic key end of the Hunter wrench into the lifting socket of the sprinkler and turn 90°. Pull the riser up to gain access to the nozzle socket.
Using the steel hex key of the Hunter wrench, turn the radius adjustment screw counterclockwise to be sure it is not blocking the nozzle socket opening. If a nozzle is already installed, it can be removed by backing out the adjustment screw and turning on the water, or by pulling outward on the nozzle “ears” with a pair of needle-nosed pliers.
Slip the desired nozzle into the nozzle socket. Note that the socket is angled up 25°. The “ears” should be adjusted so that the nozzle range screw threads directly down between them. Then tighten the nozzle range screw. The raised bump with an arrow on the rubber cover will always indicate the location of the nozzle and direction of water flow when the sprinkler is retracted.
Hunter PGP® – Aligning the Right (Fixed) Side of Arc
If the right side of the arc is not properly aligned, the results may be a wet walkway or a dry turf area. The right side arc can easily be realigned. One way to realign the right stop is to turn the whole sprinkler body assembly and the fitting below it, left or right to the desired position. This may require temporary removal of the soil around the sprinkler to allow you to grip the sprinkler housing. Another way to reset the right arc is to unscrew the body cap counterclockwise and remove the internal assembly from the body. Once removed, rotate the nozzle turret to the right stop, screw the internal assembly back into the body with the nozzle aligned to the right side of the area you want irrigated (Fig. 9). At this point you have realigned the right arc stop, and you can adjust the left arc to an appropriate setting.
Note: It is not necessary to dig up and remove the whole sprinkler to realign the right arc.
Note: The G Type rotary sprinklers adjust the same way a PGP does. See the PGP Installation and Adjustment Instructions above.
SOURCE: HUNTER IRRIGATION
The R-50 is an internal impact sprinkler. This means that there are two small stainless steel balls that act as the drive mechanism.
Rain Bird R-50 Arc Adjustment
To increase the arc – Keep in mind that the sprinkler is preset to approximately 180°. Pull up on the stem; slide the vandal collar out of its groove. Push down on the nozzle slightly, and rotate the nozzle to the right (clockwise). The arc will be increased by the amount the nozzle is turned. For example, if the arc was previously set for 180°, and it was turned 90° while the nozzle was pushed down, the sprinkler will now have an arc of 270°. Be sure to replace the vandal collar when finished.
To decrease the arc – Pull up on the stem; slide the vandal collar out of its groove. Push down on the nozzle slightly, and rotate the nozzle to the left (counter-clockwise). The arc will now be decreased by the amount it is turned. Be sure to replace the vandal collar when finished.
To change the arc to a full circle – Remove the internal assembly from its case.
Slide the vandal collar out of its groove, and rotate the nozzle to the right (clockwise) until a strong resistance is felt. It will feel as though it is locked in place. Return the vandal collar to its groove. Rotate the nozzle to the right (clockwise), there should be no resistance felt in the 360° turn.
SOURCE: Rain Bird
Spray / Mister type heads – Adjusting the direction of watering
The stem can be adjusted to change where the pattern of the spray waters.
Spray / Mister type heads – Adjusting the pattern of spray (only available on adjustable nozzles)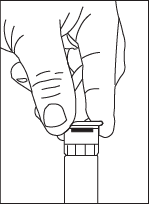
Adjustable nozzles can be set to throw from 0 to 360 degrees.
Twist the collar directly below the top of the nozzle, or on some heads the collar is the top of the nozzle to the right or the left to achieve the desired watering Pattern.
The common problem of heads sticking up may indicate that the heads are worn and need to be replaced.
Spray / Mister type heads – Adjusting distance of spray.
- Turn the small center screw with a small flat screwdriver.
- Turn the screw clockwise to reduce spray distance up to 25%. Do not decrease over 25% or the pattern will fluctuate greatly.
Walla Walla / Hunter Mp Rotator Adjustments
Use the MP Rotator Adjustment Tool for faster, easier adjustments.
- Install the MP Rotator with the Left Edge Indicator pointing to left side of the desired watering area.
- With the water on and the MP Rotator in the pop-up position, rotate Arc Adjustment Ring clockwise to increase the arc, counter-clockwise to decrease the arc.
- Use the built in ratchet feature to fine tune edge alignment by simply overriding the left or right resistance points in either direction.
The radius can be adjusted down up to 25% by turning the small screw on the top of the nozzle with the mp rotator adjustment tool or a tiny flat blade screw driver. The radius will not decrease over 25%.
SOURCE: Hunter Industries
The above are adjustment instructions on the most common style of sprinklers. Additional adjustment resources are available below…
The wrench will stop turning, or there will be a ratcheting noise, when the maximum arc of 360° (full circle) has been reached.
Hunter PGP® – How to Decrease the Arc
Insert the plastic key end of the Hunter wrench into the adjustment socket.
While holding the nozzle turret at the right stop, turn the wrench counterclockwise. Each full 360° turn of the wrench will decrease the arc 90°.
Adjust to any arc between 40° and 360°.
The wrench will stop turning, or there will be a ratcheting noise, when the minimum arc of 40° has been reached.
Request Service
"*" indicates required fields


